Body Clipping Horses:
Why We Clip, When To Clip,
& How To Clip
A complete guide to all things for body clipping your hairy horse!
As the days get shorter and horse hair gets longer, many horse owners consider body clipping to manage their equine's shaggy winter coat. Body clipping horses takes significant time and planning. Although it is not likely to make your top-ten list of favorite barn chores, a body clip can offer significant benefits to your horse's health and work performance. Clipping your horse will also lend some benefits to you by reducing clean-up and cool-out time.
Proper equipment makes the job easier, and going in with a plan will help produce a clipped horse you want to show off and not hide in the back pasture! In this guide we will go over how to determine if you need to clip your horse, what you'll need to properly clip, and lastly how to clip your horse.
Why Body Clip a Horse?
We've all seen the fuzzy pony with the outrageous winter coat. Unclipped, this will lead to tedious grooming sessions, and a drawn-out cool-down process so the horse does not return to their house a sweaty mess. Body clipping creates a shorter coat to allow the horse to release body heat without becoming sweaty, making for a more efficient cool down. You also gain the benefit of a shortened grooming process, making dirt and shavings much easier to brush off.
Depending on your climate, the difference in the high and low temperatures in a day can vary quite a bit. The lower the temperature at night, the more coat your horse will tend to grow. When ridden during the warmer part of the day, an unclipped horse will sweat quickly due to their thick winter coat.
Once the coat is wet, it is challenging to get the horse dry before their muscles cool off. Cold muscles and a cold, wet coat make for a cold horse. A cold horse is more prone to muscle soreness, cramps, and strain on the immune system. Once they've dried naturally, the leftover sweat can create matted hair, which pulls on the skin in high-pressure areas.
Some horses have medical conditions that require them to be clipped more often to keep them comfortable. One is Cushing's disease, a metabolic disease in which shedding is delayed, they are more susceptible to dehydration, and they experience increased sweating and urination. By taking the excess hair off the affected horse, they can rest easy and stay cool and dry.
Another condition that could increase your need to clip is anhidrosis. This is a condition in which the horse's sweat glands decrease or stop working altogether. Without thermoregulation, horses have limited ability to deal with potential heat-related illnesses like heatstroke.
Thanks to body clipping, we can control how much the horse sweats and how long it takes for them to dry off, ultimately keeping the horse comfortable all winter long.
When to Body Clip a Horse & When Not To
Before you bring out the clippers, determine if your horse should be clipped in the first place. There are many factors to consider, such as the horse's workload, access to shelter, and whether or not they will be on a consistent blanketing schedule.
Use this helpful checklist to decide whether or not your horse needs a haircut this winter:
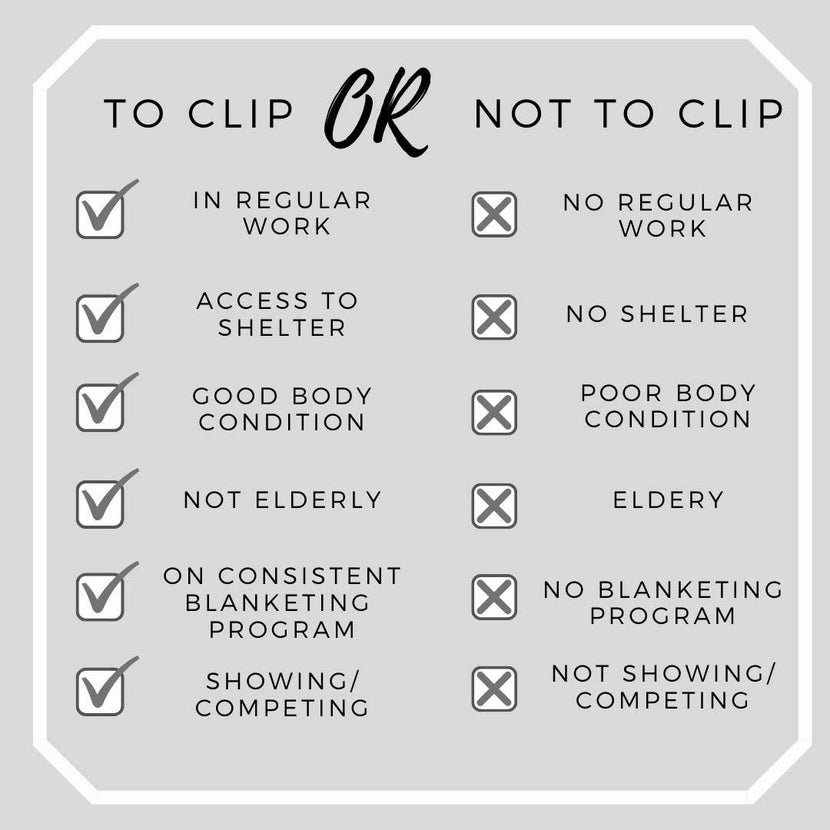
Determining Whether to Body Clip
- Workload: The horse's workload over the winter can greatly determine if you clip and what type of clip you do. Horses in heavy work that live in moderate temperatures may need a full-body clip to be comfortable, while horses that live in cold climates doing the same amount of work may need a more modified clip. Horses in light work over the winter probably won't need to be clipped at all. The main point is, if your horse consistently works up to a sweat, clipping could be beneficial.
- Shelter: Providing a space where your horse can be protected from the elements is important to consider before clipping. Even if you blanket, your horse should have a place where they can escape from bad weather.
- Body Condition: Horses with poor body conditions will have a hard time during the winter if their coat is removed, as the coat acts as their natural defense against wind, rain, and cold weather. Once this coat is removed, the horse may be affected by the elements, even if blanketed. Only horses who are healthy and have a good body condition should be clipped.
- Age: Older horses may have difficulty keeping warm during the winter, even if they are not clipped. They are probably not good candidates to have any of their hair removed.
- Blanketing: Depending on the clip type you choose, your horse might have to be blanketed all winter long. You should only blanket if your horse can be on a consistent blanketing schedule through your barn or done personally.
- Competition: Some disciplines require horses to have some sort of clip. You should check with your organization or trainer to find out if clipping your horse is required.
The Best Time to Body Clip a Horse
Horses start to develop their winter coat around mid-to-late August when the days begin to get shorter. Because of this, body clipping is typically done between September and November after the horse has fully grown their winter coat.
Some horse owners in colder climates, like those on the East Coast, may choose to clip earlier, since bathing before clipping will not be possible once Autumn hits. These horses will have to be clipped multiple times during the season to keep up with the decreasing temperature and growing coats. Those in warmer climates, such as the West Coast, use the rule of thumb "clip before Thanksgiving" and then re-clip as needed.
Even horses clipped between October and November may need a second or third clip depending on how fast their coat grows. The last clip should occur before the end of February to not interfere with their incoming summer coat.
Types of Body Clip Patterns
& Pattern Diagrams
Once you choose to body clip your horse, you must decide what type of clip is appropriate. You should pick a clipping pattern that would most benefit your situation and the various clipping factors that come with it.
| Pro-Tip: Any clip that extends to the topline of the horse (anywhere along the mane) traditionally means that you can clip either the lower half (pictured in the blanket and Irish clip diagrams) or the entirety of the face (pictured in the full body and hunter diagrams). This is up to personal preference since any of the lines can be adjusted. Most horses will tolerate the lower half of the face being clipped, while the upper half can be a little more challenging. |
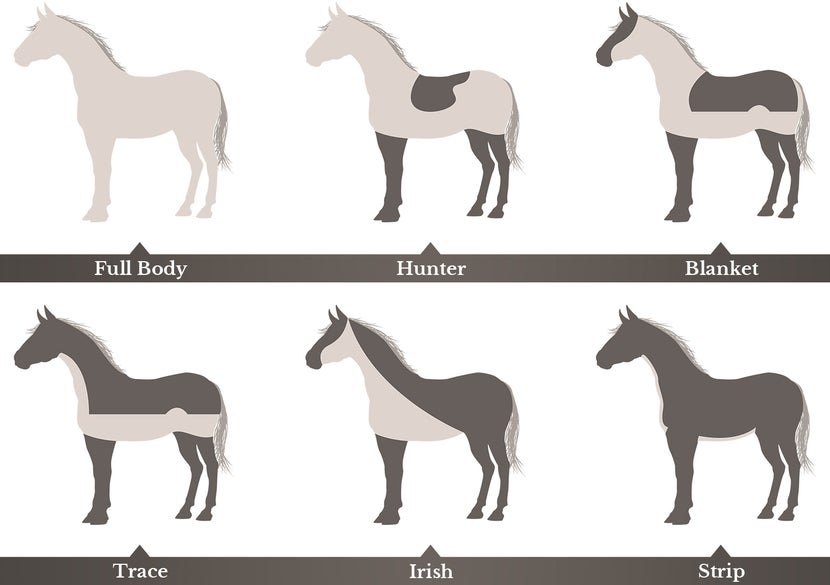
Full Body Clip
Hunter Body Clip
Blanket Body Clip
By taking the fluff off of all the major muscle groups, you end up with a horse that is better suited to hard, consistent winter work. If your horse has a tendency to be sore-backed or takes a while to warm up, you can think of this as a permanent rump warmer to keep the horse's crucial major loin muscles from getting cold, or from cooling down too quickly. This clip might be necessary for hotter-blooded horses that work themselves into a sweat sooner. A horse with this clip will need a horse rug most nights for all but the mildest of climates.
Trace Body Clip
Similar to the blanket clip, the trace clip removes hair from the lower part of the neck, the sides, and the belly. The pattern on the sides and neck can be modified to remove more or less hair depending on preference. The trace clip horse gets light to moderate work and will most likely require blanketing during the winter.
Chaser/Irish Body Clip
This clip takes a little more hair off of the major muscle groups and high-sweat areas. By clipping the whole belly, grooming is much easier since muddy crust under the girth is avoided. Also, the arch across the neck can create a very pleasing look when the horse stretches into the bit contact. This body clip will probably require blanketing your horse on colder nights.
Strip/Bib Body Clip
This clip is great for horses that are taking the winter mostly off, yet may get lightly ridden. It is also a good option if you'll be riding your horse but may not always be able to blanket, or only want to blanket on the coolest nights. The pattern eliminates hair covering the jugular vein, allowing for significant heat loss during exercise. This body clip also makes cleaning the girth area easier, a convenient benefit when dealing with winter mud.
Horse Body Clipping Supplies
Having all the necessary clipping tools at hand will make the task much easier and faster. Place everything you need on a table and have it off to the side, but not close enough to be in your or your horse's way. Prepare these clipping supplies for a seamless project, start to finish.
The Body Clip Kit Check List
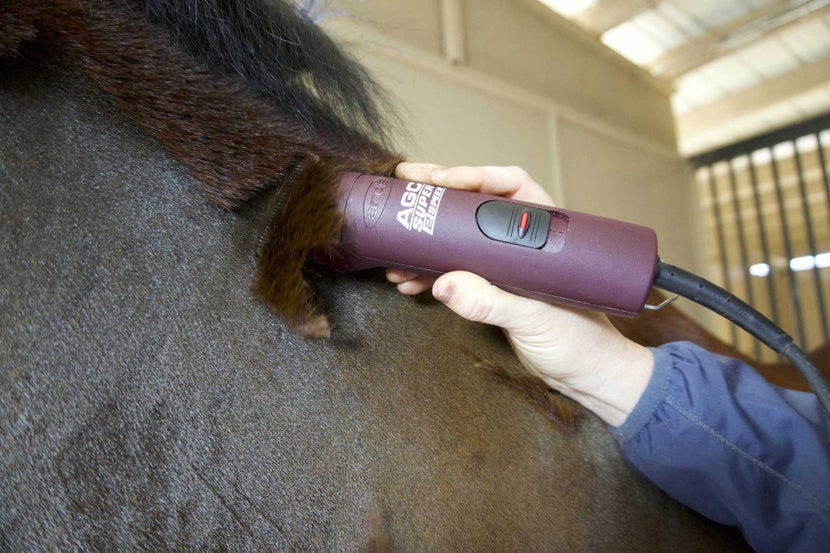
- Clippers: Whether using body or multi-use clippers, make sure they are running smoothly before you clip. Do this first since you don't want to get everything else ready only to find out your clippers are malfunctioning.
- Clean, Sharp Blades: It is helpful to have an extra pair of clipper blades on hand, even if it is only to quickly switch them out for hot blades.
- Blade Oil: Used to lubricate the upper and lower blades, blade oil is a necessity for keeping your blades sharp and working correctly.
- Cooling Spray: Used for cooling down and lubricating hot blades. A good supply of clipper cooling spray is extremely important to have on hand, as you will need to use it throughout the task, every few minutes.
- Blade Wash: Used to remove small hairs from the blades. However, it strips the oil from the clippers.
- Small Brush/Toothbrush: Cleans the blades and the interior of the clippers once the blades are removed.
- Dandy Brush: A clean, stiff dandy brush is helpful for quickly swiping away loose hair that the clipper produces.
- Extension Cord: Clipper cords are often not long enough, so it is handy to have an extension cord available. However, ensure the cord stays away from the horse's legs as it could be unsafe for both the animal and the handler.
- Chalk/Tape: If you are doing any kind of clip that requires lines, such as the trace or Irish clip, use chalk or tape to create an outline to get the clip pattern just right.
- Sturdy Step Stool: Helpful for easily reaching the horse's head, mane, and back.
- Chain/Twitch: Some horses may need to have a lip chain or twitch applied for all or certain parts of the clip. Always consult a trainer or veterinarian before using either of these tools.
- Treats: Encourage patience and reinforce good behavior with tasty horse treats!
- Hay Bag or Earplugs: If you have a nervous horse or one that is being clipped for the first time, distracting them with a full hay bag or blocking the noise of the clippers with equine earplugs might help put them at ease.
Finally, you will need a clean, open area to clip. Preferably a quiet place in the barn where the lighting is good so you can see what you're doing. This will better ensure the safety of you and your horse while speeding up the clipping process.
Choosing the Best Body Clippers
There are three types of clippers: body clippers, multi-use clippers, and trimmers. Consider these factors when choosing the best clipper for your needs:
- Will you be clipping the entire body or only part of the horse?
- Are you clipping one horse or multiple horses?
- Are you able to own various types of clippers or just one?
- Do you have specific requirements? For example, do the clippers need to be cordless or very quiet?
Once you have determined your needs, it's time to pick a clipper. Each of these clippers has a distinct purpose, and some may be better for body clipping than others, depending on your situation. Consider the advantages and disadvantages of each type to select the clipper that best fits your needs.
Body Clippers:
| Pros | Cons |
|
|
Multi-Use Clippers:
| Pros | Cons |
|
|
Trimmers:
| Pros | Cons |
|
|
Parts of Clipper Blades & Understanding Blade Size
Blades come in different sizes and shapes. Some clippers have specific corresponding blades while others can accommodate different-sized blades. Choosing the right blades depends entirely on the type of clip you are doing and the length you would like the horse's hair to be. Often you will buy clipper blades separate from other clipping equipment. Because of this, it is important to understand the differences between different types and sizes to ensure you get the right one for you and your horse.
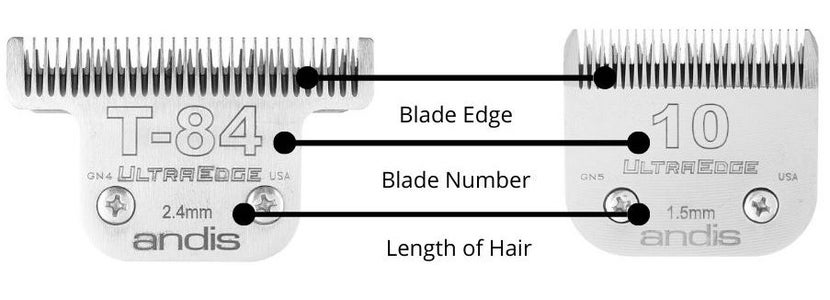
Blade Numbers
Typically, the lower the number on the blade, the longer the hair will be. Therefore blades like the T-84 and #10 are popular choices for body clipping. Higher blade numbers such as #30 or #40 leave the hair very short and are reserved for clipping specific places such as the inside of the ear or for veterinary use.
| Blade Number | Hair Length |
| T-84 | 2.4 mm |
| #10 | 1.5 or 1.8 mm |
| #15 | 1.2 mm |
| #30 | .5 mm |
| #40 | .25 mm |
Blade Edge or Cutting Edge
The tip of the blade is called the blade edge or cutting edge. The rule of thumb for this part is, the longer the edge, the longer the hair will be. For example, a #10 blade will have a longer edge than a #40 blade.
Blade Width
Blade widths come in two sizes: normal and wide. The wide blades are sometimes indicated with a "W" and are a suitable choice for large surface areas. They are popular for clipping the body of the horse, while the normal blades are a better choice for their legs and face.
Blade Maintenance
Properly caring for your blades extends their life and gives you the best clip job. Keep your clipper's blades clean and well-oiled as you clip to prevent overheating and help keep your horse comfortable. Once you finish clipping, thoroughly clean the blades using a small brush or a toothbrush. Additional blade wash can help remove small hairs from the blades. When finished, oil the blades and put them in a storage container to prevent damage and rust.
To keep clipper blades sharp, you can typically find a professional to send your blades to to resharpen. However, sometimes local knife sharpeners can service your blades, or you can invest in a kit to handle the task yourself at home.
How to Body Clip a Horse in 8 Easy Steps
A complete process from start to finish to ensure a proper body clip for your equine friend.
Now that we know what we need, let's look at the complete process of how to properly clip your horse. We've broken down the process into eight easy steps below. We encourage you to watch our clipping video guide below while reviewing each step for the best results.
- Before you begin clipping, you want to make sure you start with a very clean horse. A deep, thorough bath is best, however, if you live in colder climates, a good currying will suffice.
- Once you have a clean, dry coat, spray on a coat polish to help the blades glide through the hair. This step is extremely important because dirt and grime can clog up and dull the clipper blades, which will produce lines and uneven spots. It will also limit the life of the clipper blades.
- Next, you will want to oil your blades thoroughly. Turn the clippers on and point the blades downward. Place the oil along the upper and lower blades and let the clippers run for a few minutes. Turn the clippers off and remove any excess oil that didn't get distributed.
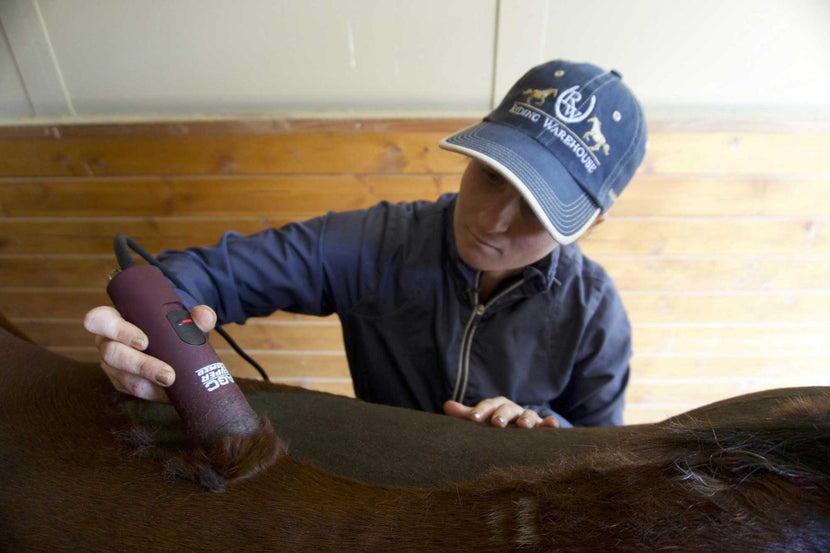
- To get started, turn on the clippers and use the blades against the growth of the horse's hair. You want to make sure to keep the clippers flat against the horse and travel in long, even strokes. You can overlap your strokes for a clean and even finish.
- It is best to start at the shoulder, which can be helpful for horses who are new or not used to clipping. Once they are comfortable with the clippers, move up to the face before the clippers begin to heat up.
- Periodically, you should lubricate the clippers. When the upper and lower blades rub together to cut the hair, they produce heat. Applying a cooling spray every few minutes will prevent them from overheating, which is uncomfortable for the horse and will not cut the hair cleanly.
- Oil also needs to be used during the clipping process. It is recommended to use a 3:1 ratio of cooling spray to oil. If you notice at any time that your clipper is having difficulty clipping the hair or is making lines, you should stop, oil the clippers, and let the blades cool before starting again.
- Once the horse is fully clipped, they need to be thoroughly groomed or bathed to remove the oil left by the clippers. It's important to remove the oil so it does not irritate the horse's skin and won't stain the interior of their blanket. Once cleaned, apply a finishing coat polish to give them a fresh sheen.
Clipping Tips by Body Part
Face
Clipping a horse's face and ears requires patience, especially if the horse does not like the vibration. Make sure the blades are cool and put the clippers on a low speed to keep the feel more gentle. Start at the throat and work your way up to the cheekbone. Since the skin can be loose, use your free hand to pull it tight. When approaching the eyes, close the eyelid to prevent fine hair clippings from entering the eye. If you are not starting with the face, change your blade at this point to ensure it's not hot.
Ears
For each ear, gently cup and close its sides together lengthwise and clip downward against the outside adjoined edges of the ear. To clip the back of the ear, pull down gently on the tip of the ear so it is flat and clip downward.
Whorls
Whorls, or areas where hair grows in a circular direction, typically occur on the chest, flank, and face. When clipping these areas, simply continue to work against the direction of the hair. You may need to go over the area a few times to trim all the hair evenly. When working on whorls on the chest, use a hand to hold the skin flat and taught to clip the area more easily.
Mane
When clipping around the mane, invert the clippers so you can clip downward against the hair. Hold the clippers in one hand and hold down the mane in the other; this prevents the mane from getting caught. Proceed in this manner along the entire mane and topline.
Elbows
Elbows are easier to clip cleanly when you pull the skin taught. You can either hold the skin above or below the elbow to clip or have a helper hold the horse's front leg for you so you can clip behind the elbow.
Legs
To clip the legs more easily, pick up each leg as if to pick out the foot. The horse's tendons will then be softened, allowing the clippers to access the contours of the leg while making it easier to remove the fetlock hair.
Blanketing the Clipped Horse
Once you've clipped your horse, you need to decide what weight of turnout to put on your newly hairless companion. Although some horses are more sensitive to the cold than others, horse owners can usually follow these turnout guidelines.
See our Complete Guide to Horse Blanketing, and the rest of our Winter Blanket Articles to learn even more detailed blanket instructions and tips.
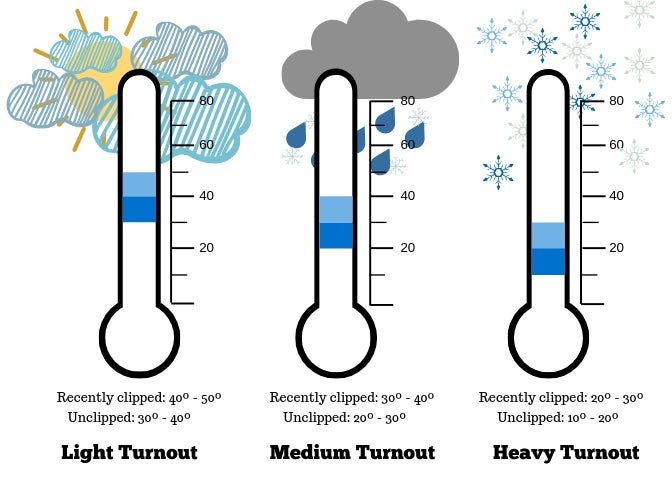
These blanket suggestions are just that: suggestions. If you know that your horse runs hot, your temperature ranges might look different compared to one for a horse who shivers at the sight of winter. That being said, here are some guidelines for usual blanketing needs based on temperature:
- Light Weight Turnout: 40°-50° for clipped horses, 30°-40° for unclipped horses
- Medium Weight Turnout: 30°-40° for clipped horses, 20°-30° for unclipped horses
- Heavy Weight Turnout: 30° and below for clipped horses, 20° and below for unclipped horses
Last Hairy Thoughts
Whether you are clipping for the first time or for the hundredth time, the only way to improve your skill level is to practice. While few equestrians love the chore of body clipping, knowing the proper methods and having the right tools can make all the difference! We hope this guide helps you better understand why we clip and the conditions that affect the horse's need, as well as the equipment required and how to use it. If you have any questions, feel free to reach out to our friendly customer service at info@ridingwarehouse.com or by calling 1-800-620-9145. Ride on!
Further Reading
- Michigan State University on Body Clipping Horses
- Michigan State University on Cushing's Disease
- Kentucky Equine Research on the Science Behind Blanketing, and Clipping Horse Hair Coats
- Kentucky Equine Research on Anhidrosis in Horses and Electrolyte Therapy