How to Braid a Horse Mane:
Dressage, Jumpers, & Eventing
A time-honored tradition, braiding a horse's mane is a critical part of proper turnout for many English disciplines. Originally meant to keep the hair from tangling, braids are now used during competition to give the horse a more refined appearance and accentuate their neck muscles. While it is not technically required by rule, many equestrians believe braiding is a sign of respect for the sport when competing at a nationally recognized show.
Since braiding is expected, many riders rely on professional grooms or professional braiders. While they are efficient and skilled, they are also expensive. Whether you're a seasoned braider just looking to pick up some handy tips or you've never tried to braid your horse's mane before, this guide will cover the tricky task of braiding for dressage, jumpers, and eventing.
Types of Horse Braids
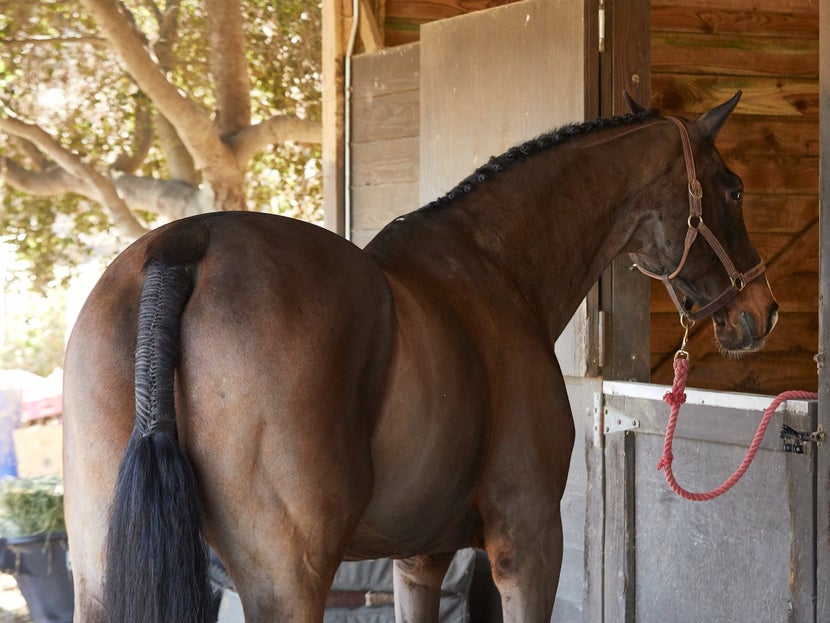
The style of braid that you choose to put in your horse mane is dependent on a few things. First and foremost is the discipline that you are showing. If you are doing pure dressage, bigger braids are used to make the horse's neck look more muscular, especially in the top line. In eventing, braids are still round but more controlled and used to shape the horse's neck based on their conformation (to make it look longer or shorter). In hunters and equitation, small braids are used to help elongate the horse's neck and to create a fluid line along their crest.
Secondly, the length and texture of your horse's mane will also influence the braids you can successfully put in. A long, thick mane may require more braids, while a thin or especially short mane may only hold a few. Lastly, the compliance level of the horse can change how you decide to braid. Often young or squirrely horses go in banded braids instead of yarn because of their ease.
There are no rules about which braids you have to use in certain disciplines, but some are more commonly used than others. In terms of difficulty, each type of braid has its own pros and cons. For some, using rubber bands to control the hair works best, but others find that braiding with yarn gives them the most control. Trying different styles of braids (at home first!) is a great way to find what works best for you and your horse.
Rosette Braids:
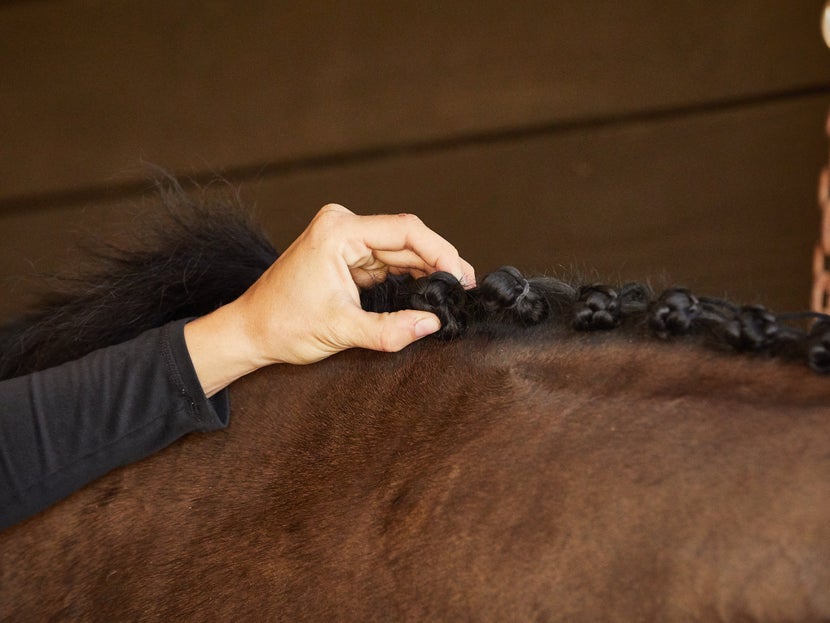
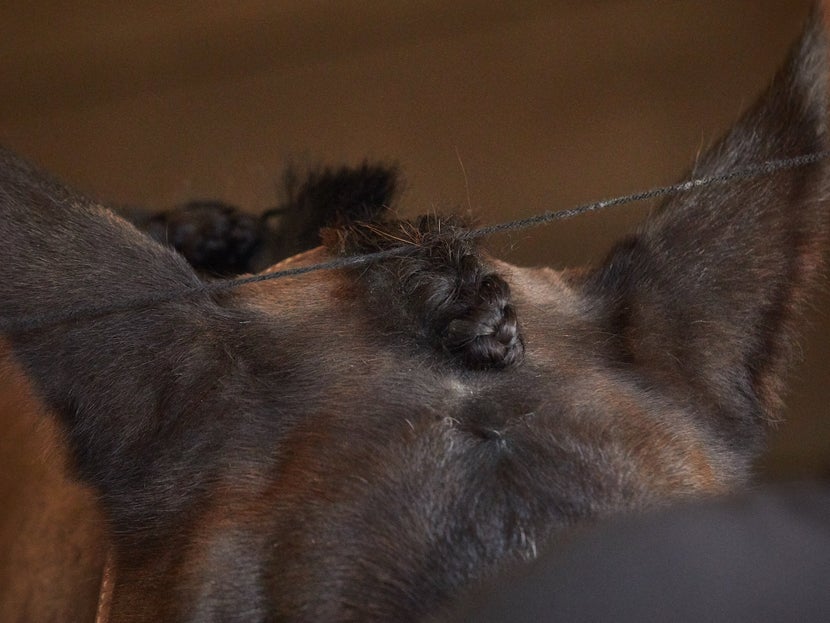
These braids can only be executed with yarn and involve tying the braided strand of mane into a knot and then securing it in place. Becoming increasingly popular, rosette braids produce a unique look that works with manes that are a bit longer but still relatively thin. This type of braid stays in well, so it is a good option if you plan to braid your horse the day before the show or if you will be competing over fences.
Used for: Eventing and Jumpers (and Dressage, but much less common)
Button Braids:
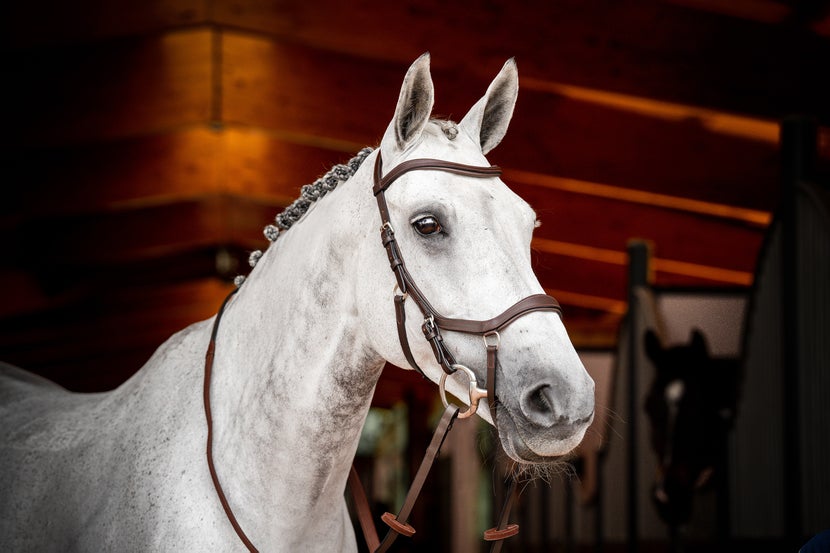
Common for all disciplines, button braids involve folding the braided mane into a ball and then securing it with a band, clip, or yarn. While it is quicker to use bands or clips, button braids will look neater and stay in longer when done with yarn. This type of braid tends to look best with shorter manes.
Used for: Dressage and Eventing and Jumpers
Hunter Braids:
Used in hunters and equitation, these braids have a completely different look than button or rosette braids. Held in place with yarn, hunter braids are small and close together. The meticulous process of braiding a horse for hunters will be covered in another article — stay tuned!
Used for: Hunters and Equitation
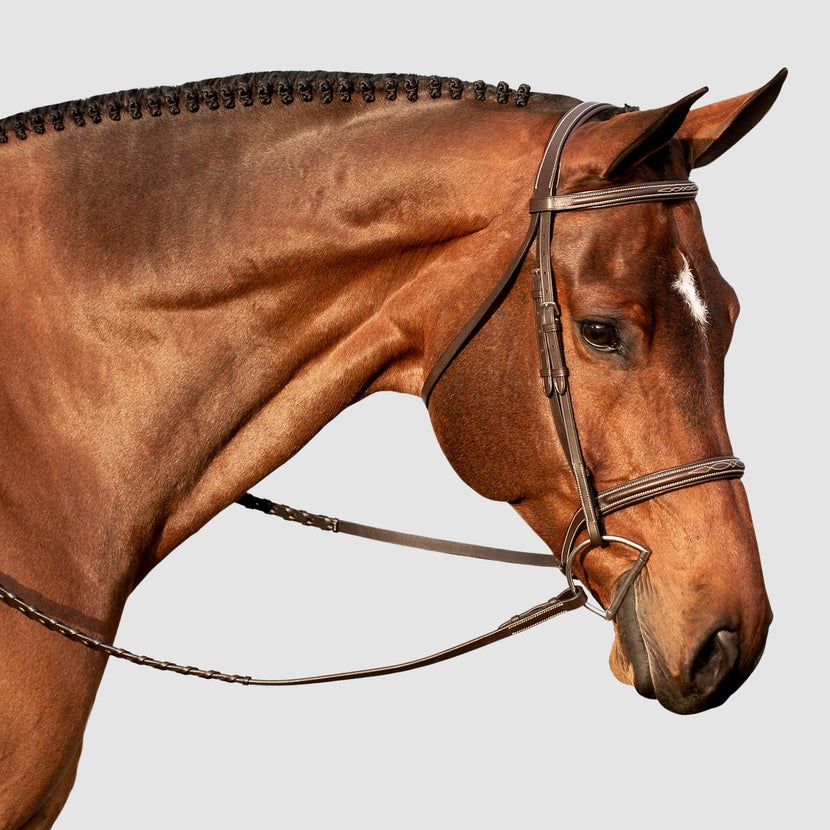
Running Braids:
Used with horses who have a longer mane, this singular braid extends the whole length of the neck. This technique uses French braiding along the crest of the neck, which helps show off the horse's muscle structure. It is braided off at the withers.
Used for: Dressage and Breed-Specific Shows
Braiding Supplies
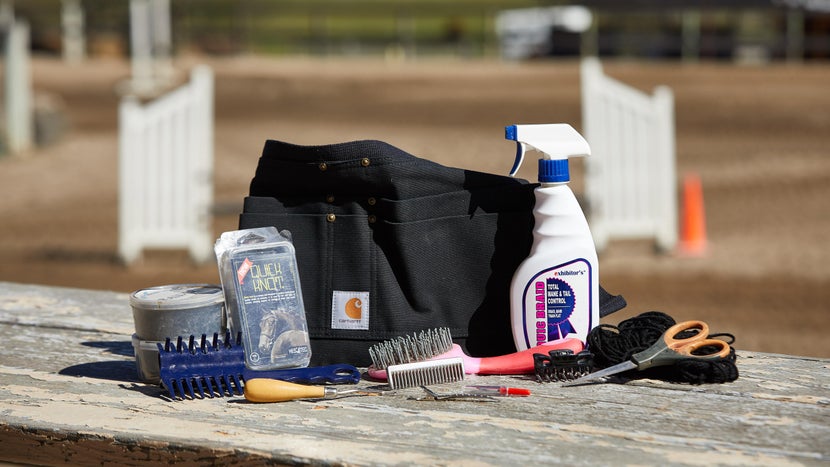
Braiders often have their personalized braiding kit. It will include all their tools and anything that could be useful for their braiding process. Not all of these pieces are necessary for braiding, but they all help in some way or another. If you know that you're only going to do rubber band braids, you don't have to include items like yarn and pull-throughs.
- Pulling comb: This kind of comb is used to thin the mane before braiding so that it is easier to work with. If your horse doesn't let you pull his mane, you can use a mane thinner to trim the mane.
- Mane comb: You can use your pulling comb or another type of mane comb to brush through the mane and divide it into sections to braid.
- Mane clip: A clip keeps the hair that you are braiding separated from the rest of the mane.
- Quic Braid: This product helps to wet down the hair so your braids are as neat as possible.
- Yarn, waxed thread, Braiding Bands, or Braiding Clips: Depending on which braid style you want, you might choose to use yarn, braiding bands, or braiding clips. You should use a color similar to your horse's mane.
- Pull-Through: If you are using yarn, you will want a pull-through to secure the braids in place. Like the yarn, you can buy this tool from your local craft store (often called a Latch Hook Tool).
- Embroidery Needle: When using yarn or waxed thread, you can use a blunt needle as an alternative to a pull-through.
- Seam-Ripper: This tool is helpful for removing braids done with yarn.
- Scissors: A small, sharp pair of scissors helps cut the yarn easily so that the end result comes out as clean as possible. You might also use these to cut any stray hair at the end.
- Apron: While not crucial to the braiding process, an apron with pockets will keep everything in reach while you work.
- Step Stool: In order to see the mane and make braiding easier, most braiders opt for a stool to stand on. Some types even have a storage compartment so you can keep all of your tools in one place.
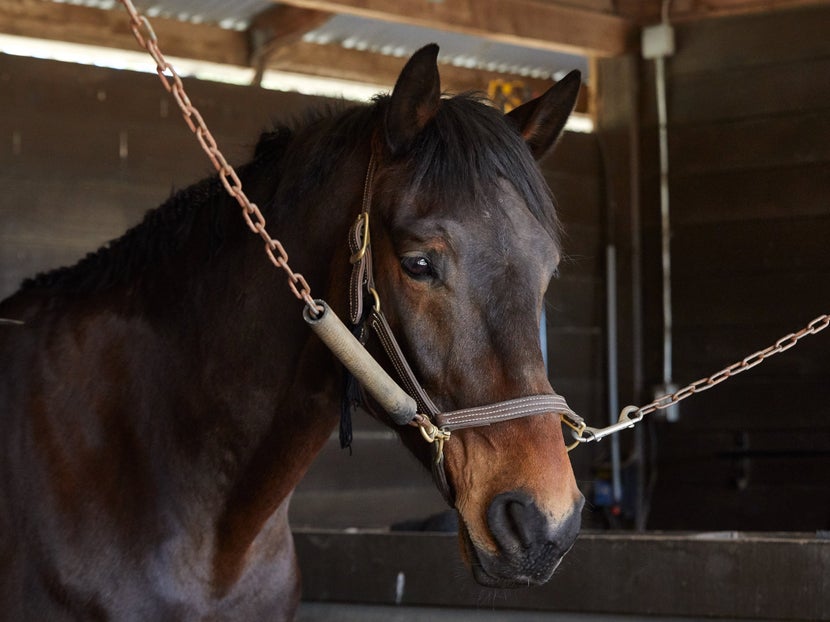
Prepare to Braid
When you know that you have a competition coming up, you should pull your horse's mane ahead of time. Pulling the mane involves teasing the mane up while holding onto the longer strands, then pulling the long strands out from the root.
The amount of mane you pull will affect the size of the braids. Pulling the mane decreases both length and thickness, all of which lead to a smaller braid. The thickness of the mane is important because short, thick hair is much harder to braid and roll up. If the horse's mane is thick at the time of braiding, opt for smaller sections and more braids, rather than large sections. Pure dressage riders usually prefer bigger braids, while eventers like smaller braids.
It's traditional for braids to be on the right side of the neck. If your horse's mane lays on the other side, you might consider training it over by banding it before the show. Additionally, if you are bathing as part of your prep, make sure not to use anything in the mane that will leave it slippery. This includes some shampoos and most conditioners. Having a little grime in the horse's mane will make it easier on your end!
When it is time to braid, tie your horse somewhere with minimal distractions. Get all of your tools together ahead of time and have them in a place where they are easily accessible. This is when it helps to have an apron to stash everything in! Make sure you have a stool to stand on so that it's easy to reach the mane and see what you are doing.
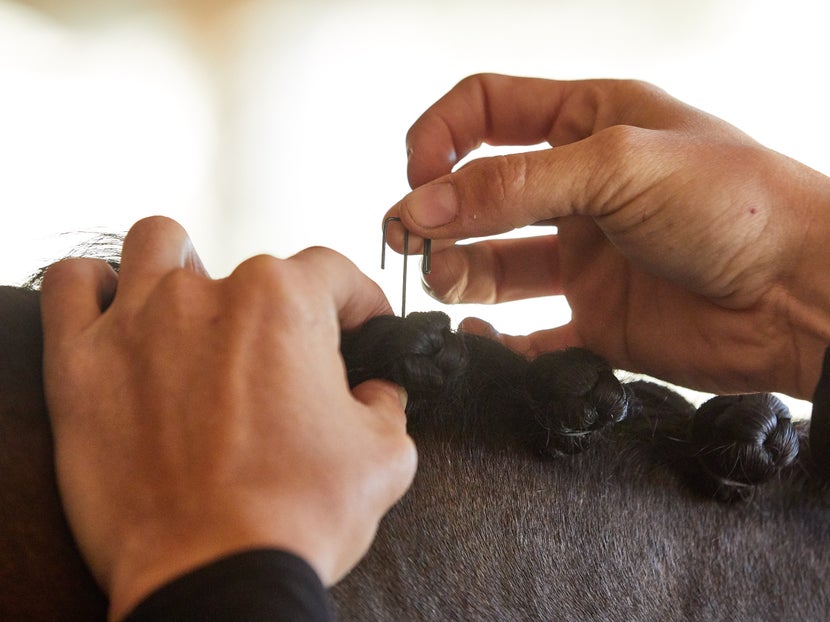
Braiding with Yarn
For tidy braids that stay in overnight and while competing, many equestrians choose yarn or waxed thread. Rosette braids are popular in the US since they are quick and easy to put in and work well with different lengths and thicknesses of mane. You can also tie button braids with yarn, but in this article, we will focus on rosette braids to showcase how to use yarn.
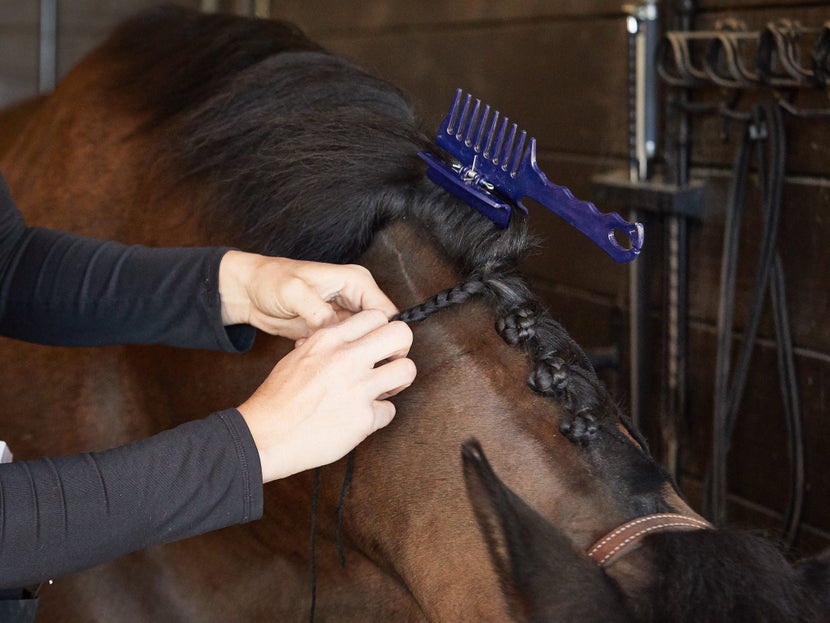
Steps for Braiding with Yarn:
- Start by cutting your yarn into long sections. It is helpful to wrap the yarn from your hand to your elbow to determine the length needed. One piece of yarn is a full length of hand to elbow to hand. How many sections you will cut depends on the length of your horse's neck and how many braids you intend on doing.
- Plan on breaking the mane into about 1-2" sections for each braid; an easy trick is to lay three fingers down and use that as your spacer. You can adjust this based on how thick your horse's mane is. Use your comb to make a clean part in the mane, then use your clip to keep the rest of the mane out of the way.
Pro Tip! Always start your braids from the horse's poll. If you don't have enough hair at the end for a full-width section, it will be too close to the saddle for people to take note of. Vice versa, if you have one tiny braid at the horse's crown piece, it will grab attention. - Spray Quic Braid at the top of the hair so that it is easier to collect into a braid. As you braid down (not out or up, down!) try to keep it as tight as possible. Once you get about halfway down, begin to braid in the yarn.
- Once you get to the end of the braid, tie your yarn once or twice to make sure the braid stays secure. Next, tie an overhand knot using the braid, making sure the end of the braid goes all the way through. You will want this knot to be tight so that it stays in.
- Use the pull-through to pull the yarn through the base of the braid, right along the crest, then tie the yarn once below the braid and once above. Finish up the braid by tying the yarn one last time at the top.
- Repeat this process for the rest of the mane, then cut off the loose ends of yarn when you are done.
Braiding with Bands
Bands are quicker to use than yarn, but they generally don't stay in as well. These are helpful to use if you are braiding the day of the show. Many dressage riders use bands since they don't need to keep the braids in over fences.
Steps for Braiding with Rubber Bands:
- Begin by separating off a section of mane and braiding it down, the same way that was described in the yarn section, but don't add in the yarn.
- Once you get to the end of the braid, secure it with a rubber band.
- Fold the braid up so it is in a neat ball with the banded end on the underside, then secure it with a band or two.
- Do this for the entire mane.
Braiding with Clips
Braiding with clips allows you to achieve the look of braiding with yarn but without the hassle. They are also a good choice for horses with thicker manes, where rubber bands may snap due to larger knots. Best of all, clips can be reused multiple times, so they are an economical way to braid. The Quick Knot clips are extremely handy for a quick braid that stays in well.
Steps for Braiding with Clips:
- Braid the mane down like before and use a rubber band to secure it.
- Fold the braid into a ball with the banded end tucked underneath, then slip a Quick Knot clip through the middle starting from the top.
- To secure the braid, all you have to do is bend the end of the clip!
- Repeat for the rest of the mane.
Braiding the Forelock
Complete your show-ready look by braiding the forelock, unless you plan to use an ear bonnet. If you are planning to use a bonnet, still make sure to secure the forelock so that it doesn't peek out from under!
- Start by spraying Quic Braid on the hair, taking care not to spook the horse, then brush through the forelock before you start the braid.
- French braid the forelock for a clean look that keeps all of the hair in place.
- Once you finish the top of the forelock and transition into a regular braid, you will add yarn to your braid.
- Secure the braid by tying the yarn then use the pull-through to pull the end of the yarn through the top of the braid. This means sticking the pull-through in the top of the French braid, staying close to the base of the hair. The pull-through should come out at the bottom of the French braid. Then connect your yarn and pull through. The end of your regular braid should be inside the French braid.
- Separate the two strands of yarn on either side of the forelock, then pull each strand of yarn to the opposite side. Complete the braid by tying the yarn.
| Pro Tip! If you have chosen to use bands for the forelock, still French braid the forelock and continue into a regular braid, then simply secure the end of the braid with a band, fold it into a ball, and secure it once more with another band. |
Tips For All Braids
- Braiding will automatically look neater if your sections are the same size. It can help to section out the entire mane before starting to braid, especially if you are aiming for a certain number of braids. Consistency is key.
- Practice, practice, practice. Not only does this help your braiding technique, but it also helps you get faster and more efficient. This way you can plan your timing at shows better!
- Know your horse. Some really don't like sleeping in braids and try to rub them out. While products like mane tamers help keep braids in, they can't protect them all. For some itchy horses, it is better to braid the day of. For all horses, fly spray can help keep them comfortable while their natural swatters are tucked away.
- When all of your braids are in, it's tempting to trim away all the stray hairs. Clipping a few is okay but be sure to avoid taking chunks or "influential" hairs. If you take too much, it will be apparent during your unbraiding process. No one wants a choppy mane.
Remove the Braid & Keep the Mane
When you're ready to take out your horse's braids it is important to carefully avoid ripping out or cutting the mane hairs. If you braided with yarn or thread, you'll need a seam ripper or scissors. If you braided with rubber bands, you don't need tools but scissors could be useful.
With yarn and thread braids, you'll want to snip near the knots in order for the braid to unroll, and then to be unbraided. Be careful not to catch the mane in your snips or your horse will be left with a choppy mohawk. This is especially important if you plan to braid again soon!
For rubber bands, work in reverse to how you put them in. Unwrapping bands is a low-risk way to take out the braids. If you use scissors to cut your bands, make sure not to cut the mane!
Once all of your braids are out, you are bound to have a horse with a perm. Using water and a hairbrush, direct the mane back down and wash the Quic Braid or other products out. If you plan to braid again (maybe the next day) don't put anything in the mane that could make it slippery! If you aren't braiding again soon, washing the mane with shampoo will help clear the mane of any residue.
Frequently Asked Questions
Q: How long does it take to braid a horse's mane?
A: This is highly dependent on the braider's experience level, as well as the condition of the horse's mane. If the mane is thick and short, it will be harder to braid, and in turn take longer to make it look neat. If the horse has a well-prepped mane, the braiding process will be faster. On average, it will take about 45 to 90 minutes to fully braid a horse's mane.
Q: Can I braid a mane without rubber bands?
A: Yes! Using yarn or waxed thread is a great alternative to bands and is even preferred by a lot of braiders. These options provide a stronger hold of the hair, making them perfect for multi-day braids.
Q: How long can I leave my horse's braids in?
A: You should try to take your horse's braids out within a day or two to keep the horse comfortable and protect the hair. This prevents the hair from breaking and the horse from becoming overly itchy.
Q: Should I braid my horse for everyday riding?
A: Braiding for everyday riding is a personal choice. If your horse has an especially long mane, it could be useful so that it doesn't get tangled with the reins. Some riders only braid down to help train the mane to one side. Same as any braids, these should not be left in for more than a day or two.
Q: Can I braid my horse's mane if it's thin or short?
A: Yes, you can! Lots of braiders prefer a thin mane; however, if it's too thin, adding in yarn or using extra bands to secure the braid is recommended. Short manes follow similar rules. If the mane is short and thick, it is smart to use extra yarn or bands to keep it from bursting open. Depending on your horse's mane length and thickness, determine the sectioning width that would produce a workable braid (1-inch vs. 2-inch sections) and then use that for the whole mane.
Closing Thoughts
The most important thing to remember about braiding is that it takes practice! Before you braid at a show for the first time, be sure to take the time to work on the skill at home. It's worth the effort to achieve beautiful braids for the show ring. It's also the time to determine which style of braids you prefer, and if you like some materials more than others. We hope that this guide makes braiding seem a little less daunting, but as always if you have any questions feel free to reach out to our customer service at 1-800-620-9145 or at info@ridingwarehouse.com. Happy riding!
| Shop All Braiding Supplies |